One of my personal contributions to my mothers… ahh… obsession, was to fix up that old chipboard table the knitting machine was bolted onto.

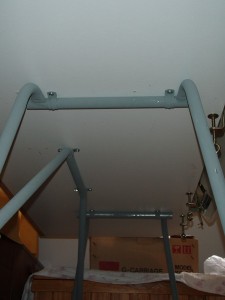
Firstly, I found that once I removed the folding legs, they themselves were quite ok. Only a little surface rust and scuffing from the occasional boot (when things weren’t going well).
A light sanding with some fine grit sandpaper to smooth it all out was all that was required.
A quick look around the shed found some spray paint with rust inhibitor built in, in a nice neutral grey matt finish.
TIP: when applying spray paint, follow the directions on the can, they always say apply light coats. It works, you get a much better finish from many fine coats than from one thick, running coat.
Next was the table top. Being chipboard or partical board, and probably from the Dark Ages, it had swollen, flaked, desintegrated, broken, lifted etc. if you knocked on it, more fell off, if it weren’t for the structurally sound floral wallpaper on the top surface, the knitting machine would have ended up in someones lap years ago. To the garbage pile it went!
From previous “DIY handy person” projects of mine, I had some Melamine sheet left over. Maybe called something different in other countries, the white, laminated on each side stuff they make kitchen cupboards out of.
Anywho, after checking out a different table with a knitting machine still attached (there are a few to look at in mums house) I decided improvements could be made.

For one thing, seeing someone, crawling under a table to get something that has fallen off the back, is well, disturbing 🙂 The fact that knitting machines are a very narrow item, means the typical table for them is also narrow. Obviously someone way back in time said “just make me a narrow table for my knitting machine to go on” and no more planning was done.
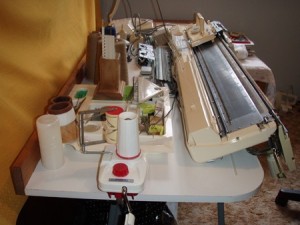
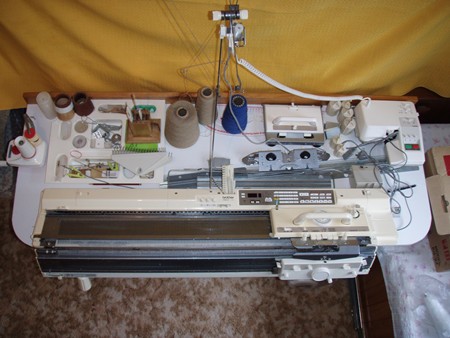
Idea No. 1 More table space for those handy items you like to have close by. As you can see, plenty of space for a yarn cone winder thingy or that G-Carriage you aren’t using at the moment. Also if the table is pushed up against a wall or mountains of balls of wool and yarn, you can sit the cones of wool you are working with on top of the table, although apparently on the floor is a better spot for them, I’m just saying you could.
Idea No. 2 Why not put a small rail along the back so things can’t fall off? I chose a piece of pine timber which, when lacquered, gives it a bit of a feature, rather than a table-made-out-of-that-kitchen-stuff look.
Idea No. 3 Rounded front corners might be a little more friendly too. Ironing the edge stripping on the curved surface tested my ironing skills, but I was pretty pleased with the result. Be sure the make the radius a decent size so when ironing the edging around it, you don’t crack or break the edge stripping stuff. Its a laminate as well so it just snaps if bent too far.
Tip : When mounting a larger top than normal, on existing legs designed for a knitting machine table, set the legs forward or closer to the knitter. The weight of the knitting machine is more than the counter weight of the back of the table top. You can’t see the other holes under the table in the photo, but I had to move the legs from their initial position after one “experiment” suggested the whole table, (knitting machine included) “would” fall forward.
Finished Product!

Or so I thought… The day I took the photos I was informed of some marvellous invention that allows you to move the whole setup around easily, knitting machine and all. What was it again? Wheels maybe? Yeah I can do it… Next time…
Great job on the table. You mentioned the yarn should be on the floor, you could always use a jig-saw or router to cut a hole for the yarn to feed through. But you did a great job as it is. You also mentioned wheels, I don’t know that I would want wheels on my machine stand, though there are ‘locking’ wheels, I think there would be just to much give with the carriage movement. Now if I were to use just my G-Carriage on that machine, sure, that would be fine then. But, how often does that happen!
Keep up the good work, its great to see another web site devoted to machine knitting!
Cheers Terry! LOL, part of the reason for the bigger top was so the G-Carriage was close at hand… In my mothers case, sounding like many machine knitting fanatics, stored in plain sight, I think it is a conversation starter 😛
I was thinking of grabbing my holesaw and drilling some holes through the top for the yarn to pass through, apparently on the floor gives the unwinding yarn further to travel, letting it unwind freely, sending it through a hole restricts this again making the result similar to sitting it on top, which I think works fine, no crawling under the table to change yarns etc. I also thought a big hole might work, instead “big hole” = “black hole” 🙂
As for the wheels, I’m planning to put wheels (locking is a great idea) onto one end only (sort of like a wheelbarrow), possibly seating each side pair of legs into a piece of timber for added stability – they don’t look very robust to me, also, adding wheels one end makes a height difference. I like to be able to “undo” projects what don’t quite work, so cutting the legs that the wheels are going onto, to make the table level, is against my grain. I will see if adding the timber makes the whole lot too high, cutting the legs down to take the wheels might be my only option.
I think there may be a page dedicated to adding wheels! 😉
the table i have has wheels and work just fine. i have carpet so i don’t even have the lock the wheels. the table is also just wide enough to fit 2 machines back to back so when i want to change machines all i have to do it trun the table around. been a great space saver. i even use my garter carriage with this table and still have no issue.
karen
Two machines back to back would be a great space saver, thats a great idea! Thanks!
I was at Ikea over the weekend and they had the perfect tables for this. I started to buy one, and then realized that it could be done at home for way less lol. funny I found this page this morning.
betty
Its a fairly simple job, I reckon everyone should have a go. Good luck building yours!
Congratulations, your my kinda guy , I went to Lowes a couple weeks ago with a similar idea. They had a Work Force{brand} adjustable work table that you have to put together and there are 2 pieces of wood that go on the top that you can crank in and out. well I did not put those on , I got a piece of plywood out of my shed, stapled on some batting and material and screwed that on the brackets that was suppose to hold the adjustable boards. My cost was $17.69 . as I had a 10% off coupon. my plywood was 20″x48″ but what ever size you want would do. Reg price on the stand was 29.99 so I guess I made a good deal but no wheels lol
@Joan. Lol, thanks! How good is it when you can build it yourself!? Even if it doesn’t turn out as pretty as a bought one, at least you can say “I built that!” Just think, if you ever have to do it again, how good the next one would be, I’m always thinking of how I will do it next time. 🙂
Nice blog will bookmark and return
Hi. Just been browsing looking for a knitting machine table and came across this page. Great ideas. I haven’t used my machine for many, many years, so just hope it will work when I get it out. My main worry is that the sound might annoy neighbours – I can’t remember what sort of noise it made but I was ‘detached’ last time I used it.
I have saved the page and will come back again.
The noise is not too bad, maybe just don’t use it at midnight 🙂 If you use a G-Carriage, personally I think thats a fair bit noisier, and the noise lasts longer as it moves slowly compared to what you can push manually. For some sound absorbtion, have soft things in the room. eg. if you have hardwood floors or tiles, get a rug. Hang some curtains, line the walls with balls of wool 🙂
I sure wish you lived in my neighborhood!
My machine toppled over yesterday due to being too having on one side and the legs of the table are not sturdy enough. I have a second table, a crafts table from JoAnn’s where my standard machine is bolted on, because that machine is much lighter I don’t have the same problems as I have with the table where the bulky machine is mounted on. I do like the idea with two machines on the same table, but since I use both of mine fairly often and on the same day it would be not practical to move them around (mine has wheels) because of the carpet. I thought maybe looking for a contraption like a “lazy susan” where the table can be mounted on with a secure lock so that the table isn’t moving while working on the machine. Not sure if it can be done….. any ideas????
@Charlene, lol, thanks!
Hi Veronika,
I have been thinking about your question… Having two knitting machines on one side of a table, with some sort of sliding track so one machine can be slid under the other, out of the way, like a keyboard drawer on a computer desk. What this would mean is one will no doubt be too high or the other too low.
A giant lazy susan would mean you would need a large area to pivot the whole contraption. Maybe not so bad if you already have two knitting machines back to back.
I think it could be done by buying a round dining table, drilling a hole in the middle for a pivot point. Then cutting a square/rectangle top larger than the round top out of something like MDF, Melamine or ply. Measure from the pivot to just short of the edge of the round table. On the underside of the topmost tabletop mount some small wheels (maybe 20 to 25mm/1 inch) diameter at regular spaces in a circle at the measurement from the pivot. Depending on size, I think 8 wheels would be minimum. These wheels should run around the round tabletop without falling off. I would make the pivot a bolt, tight on the bottom tabletop by putting washers and nuts either side so its really tight, the top tabletop would not need to be so tight so it can rotate.
For a locking mechanism, two holes drilled through both surfaces, just behind the knitting machine, but as far apart as possible, so a snuggly fitting bolt or peg can be dropped though the holes to stop it rotating, should be enough.
Wow, that sounds pretty easy!
Might have to make one myself! Don’t worry, I will document it if I do 🙂
Thank you so much for the post on how to fix a 930. I Loved it! I deal in the brother electronic knitting machines. I have a KH270 that I sold to an individual. I was working when it left my place and wasn’t when it arrived. You mentioned in your repair for the 930 that your directions were only for the direct feed not for the round plug type. The KH 270 is for the round type. I was wondering if you could do a “how to fix” on the KH270. That would be awesome!
Or at least contact me and help me out and I can post it here for others. That two would be great.
Just wondering.
Mari
Liking the table idea…a lot. Nice to see a machine knitting site which looks at other practicalities.
Elizabeth
Whats up, really excellent post, thanks for the tips!
Hi Mari,
Hmm, I can’t recall the KH270, does it have a plug pack or power brick in line with the power lead? If YES, grab an autoranging multimeter and see what voltage is at the machine end of the cable. The plug pack may be faulty, I would not open it, take it to an electronic store to see if there is one with the same specifications. Better still, if you know someone with a working machine, it on their machine to see if it works.
Hi,
Just started reading your website now (2016) and saw your perfect table. I too use a melamine top, but your idea with the round corners is one I will apply still.
Someone suggested to drill holes in it for yarn, but that could cut or damage the yarn due to the sharp edges. However, if you would buy those plastic inserts for computer cables (the ones with a top that you can make bigger or smaller) and then use a hole saw for the hole in the table (I think they are 50mm), it would give a smoother edge. They are not expensive and look good.
Will certainly keep reading your website; can do with some tips! Thank you